Replacing the valve stem seals on a VAZ 2107 without removing the head is quite easy. The article provides a complete instruction with nuances.

The content of the article:
- Signs that you need to change your caps
- Instruments
- Replacement
In one of the articles, we already wrote about what the color of the exhaust, or the color of carbon deposits on the candles, can tell. In short, both should be black.
Signs for repairing valve stem seals
However, this is not a panacea, there are several signs that it is time to change the valve stem seals:
- Increased oil consumption. Of course, you should not bring the engine to such a state, but still such a situation may arise. So, with severe wear, the oil seal becomes a filler neck, which only leads to even greater consumption. If such a situation arises, then goodbye oil in a couple of hundred kilometers. Believe it or not, it just flies out of the tailpipe;
- Blue smoke from the exhaust pipe. It is accompanied by an oil deposit at the end of the pipe;
- Black carbon deposits on spark plugs. Moreover, it should be just soot, not soot.
Tools for replacing valve stem seals VAZ

In order to replace the valve stem seals on the VAZ 2107, several special things are needed, which are on this list:
- Sockets or socket wrenches for 10, 13 and 17. May be needed for 14. Depends on the year of manufacture. Open-end spanner 13 for carburetor cars;
- Flat blade screwdriver;
- A special wrench for the crankshaft, because there is no ratchet on injection cars;
- Rassuharka - this is the popular name for a device for drying valves;
- The caps themselves are sold as a set, but you can also find it in bulk, you need 8 pieces;
- Valve cover gasket;
- Lead rod with a diameter of 8-10 mm;
- Cap remover, tweezers.
Replacing the valve stem seals on the VAZ 2107
It's time to proceed directly to the replacement. First of all, as before starting any other work, it is necessary to disconnect the negative terminal of the battery. On carbureted vehicles, you also need to remove the air filter and carburetor. Then the actions do not differ from each other.
- Remove the valve cover. In advance, you should stock up on containers for washers and nuts, because washers are specific here. Of course, you can easily find them in any auto shop, but you don't want to postpone the assembly for the sake of this;
- After that, we turn the crankshaft so as to obtain a position in which the pistons of the first and fourth cylinders are at top dead center. This can be checked using a mark on the pulley, or with a feeler gauge: in this position, both valves of the above cylinders will be free;
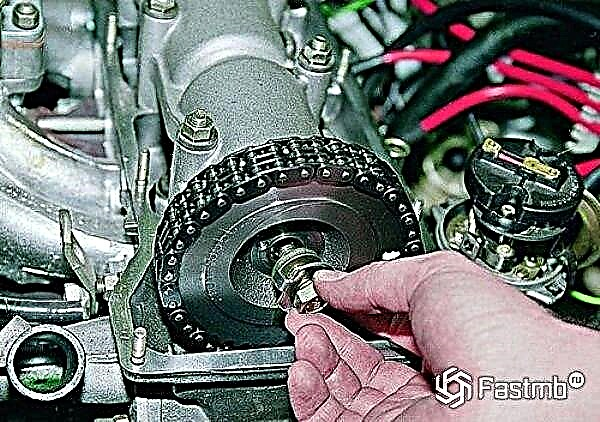
- Then we unscrew the two nuts securing the chain tensioner and take it out. At this point, it is important not to lose the gasket.

- After removing the tensioner, bend the pinion bolt retainer. In theory, the mark on the gear should coincide with the ebb on the body, but it happens differently. If this is not the case, we make marks to set it as it was. There is another option. We simply unscrew the gear, after which, without removing the chain, we wind some kind of cord around it so as to tighten the gear in the chain and prevent slipping. Then, after completing the procedure, it will be enough just to adjust the position of the camshaft.

- Next, unscrew the housing fastening nuts and remove it together with the camshaft;
- Now we insert a tin bar into the candle hole and prop the valve bottom with it. Thus, it will not fall into the combustion chamber, and during drying, it will not break through the piston crown;
- We take a drying device, attach it to a hairpin, dry the valves of the first and fourth cylinders. This should be done with a sharp movement. Sometimes it doesn't work the first time, then you need to push the cut a couple of times.

- Now we take out crackers, plates and springs with tweezers. At this point, it is advisable to be careful;
- Next, put on a puller and remove the caps. Then we insert a new cap into the mandrel and carefully press it onto the guide sleeve;
- We put in place the plates, springs, squeeze them and insert crackers. It is important that they fit into the groove. To do this, you need to lightly hit with a hammer a couple of times, but not hard, otherwise there is a risk of damaging the piston;
- Next, we turn the crankshaft 180 degrees and perform operations for the second and third cylinders.

- Putting everything together in the reverse order, install the housing with a camshaft, tighten it in the order shown in the picture;
- We put the gear in place, do not forget about the labels. Putting everything together in reverse order.
Well, that's all, replacing the valve stem seals without removing the cylinder head is over.
WHA