Learn how to properly replace the brake master cylinder with your own hands. Step-by-step instructions for newbie car enthusiasts.

Learn how to properly replace the brake master cylinder with your own hands. Step-by-step instructions for newbie car enthusiasts.
Do-it-yourself car repair, the work is not easy, it requires certain knowledge and skills. But what about a non-working brake master cylinder? Naturally, an urgent need to replace it, because without good brakes you will not go far. And in this article I will tell you in detail how to replace it without resorting to the services of a service station, because it is cheaper, and you will get new skills in repairing your own car, and even faster. In fact, there is nothing complicated, the whole procedure calmly takes place in your own garage or on the street.
The entire procedure for replacing the brake master cylinder should be carried out with an assistant without fail (at the end he will need to press the brake pedal several times). You also need to have a standard set of automotive tools (keys) for disassembling a part of the brake system and trim, and brake fluid of the same brand (preferably). The master brake cylinder diagram - will be suitable for those who decide to understand its work.
The process of replacing the brake master cylinder:
1. Disconnect the voltage from the battery - just remove the wire from the “-” terminal.

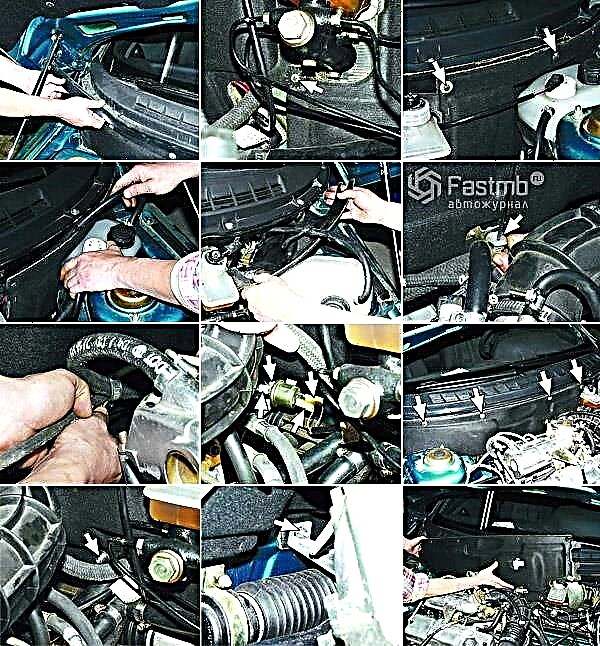
2. Carry out the procedure for removing the noise-insulating upholstery of the engine compartment. There is, in principle, nothing complicated, the main thing is to find and unscrew all the mounting bolts, as well as unfasten the hose clamps to the upholstery. Do everything carefully and do not pull strongly.

3. From the sensor, which shows the level of brake fluid, you need to disconnect the plug with the wires. 4. Next, you need to loosen the four nuts that hold the brake pipes a little.

5. To remove the master cylinder from the studs, it is necessary to unscrew the two nuts that secure it to the vacuum brake booster. After removing it, you need to completely unscrew the previous four tube fastening nuts. But before that, substitute a reservoir under the master cylinder, otherwise a little brake fluid will leak from it.
6. Now drain all fluid from the reservoir into a new, inverted cylinder.
7. We put a tank with bushings on a new cylinder. If you bought a new brake cylinder without a reservoir, then there is nothing to worry about, you can easily put the reservoir from the old one. But also do not forget to get the two rubber sealing bushings from the old cylinder that secured the brake fluid reservoir. If they are worn out and cracked there, then you should buy and install new bushings.
8. Now install the master cylinder back to the vacuum booster and tighten the two retaining nuts. Then put the empty reservoir under the bottom again and fill the reservoir with brake fluid. It is better to pour in the liquid of the brand that was, not to interfere with several types.

9. This is where the help of the second person is needed, who will press the brake on command in the cockpit. Close the four holes for the brake pipes in the master cylinder with your fingers. Now the assistant should make smooth and slow depressions on the brake pedal until the brake fluid comes out of the front holes of the cylinder.
10. As the liquid flows, you can connect two tubes to the front holes of the master cylinder and tighten their fastening nuts. But the assistant at this time must keep the brake pedal in the clamped position.
11. Install the other two tubes to the rear holes in the same way: pinch them with your fingers; the assistant presses the brake pedal; how the liquid will flow - insert and twist the other two tubes.
12. Put all the parts that were removed: connect the block with wires and soundproof upholstery.
13. At the end of the assembly of the machine, press the brake pedal and, if it is "soft", then you need to bleed the brake system.